Tuesday, October 9, 2012

Finally! A recipe we can all agree on!

I kind of can't contain myself today because it's been a while since I've had something I was dying to share with you guys.  But today, I have an autumn recipe that will surely please everyone in your house.  In fact, I believe it was my recipe that sparked this moment last week.....


I believe Barack was saying to Mitt, "can you believe that Heids McGhee put bacon in that salad?"  And then Mitt said, "Brilliant.  Women....they truly are the superior sex."

True story.

I based my autumn salad on this recipe I saw on pinterest last week.  

Heids' McGhee's Autumn Salad

  • 2-3 boneless, skinless chicken breasts
  • poppy seed salad dressing (I used Panera Bread dressing, found at Target)
  • balsamic vinagrette (I used Panera Bread dressing, found at Target)
  • 6-8 cups chopped romaine lettuce
  • 3 apples (I used 2 granny smith, 1 honey crisp)
  • 2 stalks of celery, diced
  • 1 cup dried cranberries
  • 1 cup chopped pecans
  • 1 lb cooked bacon 
  • 1/4-1/2 cup feta cheese
1.  Put the chicken in a ziploc bag and pour in about 1/3 of a cup of poppy seed dressing and 1/3 a cup of balsamic dressing.  Let marinate 1-2 hours.  Grill until cooked thoroughly.
2.  In a large bowl, combine lettuce, apples, celery, cranberries, pecans, bacon, and feta cheese.  
3.  In a small bowl, mix 2/3 a cup of the poppy seed dressing with 1/3 cup of the balsamic dressing.
4.  Pour the dressing over the salad.  Top with chicken.

Throw all your salad ingredients into a large bowl and drizzle with dressing.


Give it a good mix.


Add your grilled chicken.


This salad is delish.  I loved it.  Mr. McGhee loved it.  Mitt and Barack loved it.  My boy minis loved it.  The only person on God's Earth who did not love this salad is my tiny mini, who apparently does not like salads where the chicken touches the lettuce.


ENJOY!

A little note....yes, I confess, I bought pre-made dressing at the store.  I am certain that there are poppy seed and balsamic dressing recipes out there and I could very well have made my own.  For whatever reason, on that particular day I caved and went for convenience.  If, you do make this salad and you do make your dressings homemade...please let me know what recipes you used.

Monday, October 8, 2012

Pumpkin Lover

I love anything pumpkin.  Muffins, bread, pie, pasta.  You name it.  I love it.  Pumpkin martinis, you say?  As soon as the clock strikes noon, I'm shaking up one for myself.  

Pumpkin is very healthy, and a great source of vital antioxidants, and vitamins. Pumpkin is a low calorie vegetable that contains vitamin A, flavonoid poly-phenolic antioxidants such as leutin, xanthin, and carotenes.  What I'm trying to say is you should eat pumpkin.  

Unfortunately, my absolute favorite, pumpkin spice lattes, do not contain any of the above nutrients.  


I've been on a mission to find a recipe for a pumpkin smoothie and I finally found one that I love and want to share.  


Pumpkin Pie Cider Smoothie
  • 2/3 cup canned pumpkin, unsweetened
  • 1 cup apple cider (not apple juice)
  • 1/4 tsp pumpkin pie spice (optional spice add-in: cayenne for spiciness)
  • 1 1/4 cups frozen banana slices
  • 1/4 cup soy creamer – (I substituted with 1/4 cup vanilla almond milk)
  • 1/4 cup ice

Optional topping from the original recipe: vanilla bean coconut whip made from full fat coconut milk, a pinch of crushed vanilla bean and 2 tsp powdered sugar.  
1.  Add all ingredients in blender and blend.
2.  Add optional topping.  I added some pre-made whipped topping that was in my fridge, left by a guest this past weekend.  I also sprinkled on some pumpkin pie spice.


Wednesday, October 3, 2012

Beets! It's what's for dinner!

Am I the only one that reads things all the time and thinks, "OMG, that is totally me!"  I ran across this the other day and I couldn't help but think someone had crawled into my head before they drew this cartoon...


Lately I've been in the "overwhelmed and craving routine" category.  We are really busy and I have been working so hard to stay committed to eating healthy and homemade.  So, I have been cooking unprocessed meals that nobody in my house will eat.  There.  I said it.  I am on a streak of really crappy dinners.  And guess what?  I'm cranky about that.  Ask my kids, they'll tell ya....mama doesn't like when nobody will eat her dinners.


Both of these sounded wonderful and looked great when finished too.  But neither of them were blog-worthy.  In fact, the soup was practically inedible and the pizza was so "meh" that I wanted to cry.

The only new thing that has come out of my kitchen lately that is blog-worthy is a roasted beet salad that I made the other day.  

Roasted Beet Salad

  • roasted beets 
  • feta (or goat) cheese
  • walnuts
1.  Roast your beets.  I follow this method.....
    • 12 beets
    • 3 tablespoons good olive oil
    • 1 1/2 teaspoons fresh thyme leaves, minced
    • 2 teaspoons kosher salt
    • 1 teaspoon freshly ground black pepper
    • 2 tablespoons raspberry vinegar
    • Juice of 1 large orange 
        1.  Preheat the oven to 400 degrees.

        2.  Remove the tops and the roots of the beets and peel each one with a vegetable peeler. Cut the beets in 1 1/2-inch chunks. (Small beets can be halved, medium ones cut in quarters, and large beets cut in eighths.)

        3.  Place the cut beets on a baking sheet and toss with the olive oil, thyme leaves, salt, and pepper. Roast for 35 to 40 minutes, turning once or twice with a spatula, until the beets are tender. Remove from the oven and immediately toss with the vinegar and orange juice. Sprinkle with salt and pepper warm.  

2.  Let your beets cool for 10-15 minutes.  If you're in a hurry, you can skip this step.
3.  Sprinkle your beets with cheese and walnuts.

Here's my beets, all sliced up and sprinkled with dried thyme.  I also put sprigs of fresh thyme on top.


Once cooked, I removed the fresh thyme and let them cool a bit before adding in cheese and walnuts.


This is a simple recipe that my family all enjoys.  Beets are a fantastic source of vitamins, and the roasted beets can be refrigerated and enjoyed cold the next day!   In fact, maybe you should make a double batch of these beets in case you have a dinner failure, you have a back up plan.  Beets!  It's whats for dinner!


Friday, September 28, 2012

Pot Pie

I am often told that my tiny mini looks just like me.  I am also often told, during her moments of brilliance, that she acts just like me too.

So the other day my tiny mini got to bring her bike to preschool for a bike parade.  She was very excited, so she dressed herself in her exercise clothes and proudly told me she was going to beat all the boys.  I reminded her that was a parade, not a race.  And then I realized, that I had passed this mentality on to my mini.....


So I did the only thing I could do, I zipped up her vest, adjusted her headband, and sent her off on her Disney Princess bike to beat all the boys.


And, to Mr. McGhee, all my concerned readers....I did put a helmet on my tiny mini.  We just choose to leave it off for the photo.

I wanted to cook up something special for my little racer, so I decided that what she needed was to come home that night to a piping hot homemade chicken pot pie.

First step is to make your pie crust.  I doubled this recipe to make mine.  I used whole wheat flour for mine, which you will soon see was a mistake!

Pie Crust
  • 1 1/4 cups all-purpose flour
  • 1/4 teaspoon salt
  • 1/2 cup shortening, chilled
  • 3 tablespoons ice water
  1. Whisk the flour and salt together in a medium size bowl. With a pastry blender, cut in the cold shortening until the mixture resembles coarse crumbs. Drizzle 2 to 3 tablespoons ice water over flour. Toss mixture with a fork to moisten, adding more water a few drops at a time until the dough comes together.
  2. Gently gather dough particles together into a ball. Wrap in plastic wrap, and chill for at least 30 minutes before rolling.
  3. Roll out dough, and put in a pie plate. Fill with desired filling and bake.

The shortening that I used.


Mixing my ingredients.


Dough is rolled up and ready to chill.


My dough would not roll out.  So I had to basically push in into the pie plate to mold it into a crust.  It wasn't pretty, but it was tasty!


Next, you make your filling.

Chicken Pot Pie
  • 1 pound skinless, boneless chicken breast halves - cubed (I used thigh meat, it was on sale!)
  • 1 cup sliced carrots
  • 1 cup frozen green peas
  • 1/2 cup sliced celery
  • 2 potatoes, peeled and cut into one inch cubes
  • 1/3 cup butter
  • 1/3 cup chopped onion
  • 1/3 cup all-purpose flour
  • 1/2 teaspoon salt
  • 1/4 teaspoon black pepper
  • 1/4 teaspoon celery seed
  • 1 3/4 cups chicken broth
  • 2/3 cup milk
  • 2 (9 inch) unbaked pie crusts
  1. Preheat oven to 425 degrees F (220 degrees C.)
  2. In a saucepan, combine raw chicken, carrots, peas, and celery. Add water (I used chicken broth) to cover and boil for 15 minutes. Remove from heat, drain and set aside.
  3. In the saucepan over medium heat, cook onions in butter until soft and translucent. Stir in flour, salt, pepper, and celery seed. Slowly stir in chicken broth and milk. Simmer over medium-low heat until thick. Remove from heat and set aside.
  4. Place the chicken mixture in bottom pie crust. Pour hot liquid mixture over. Cover with top crust, seal edges, and cut away excess dough. Make several small slits in the top to allow steam to escape.
  5. Bake in the preheated oven for 30 to 35 minutes, or until pastry is golden brown and filling is bubbly. Cool for 10 minutes before serving.


Put your chicken and veggies in a saucepan.


Cover with water or chicken broth and cook for at least 15 minutes.


Once cooked, drain and set aside.


Saute your onion in butter.


Slowly add your flour and spices, stirring with each small addition.


Stir until your onions resemble this.  


Then slowly start adding your milk/chicken broth, 1/4 of a cup at a time.  Stir and mix very well after each addition.  Fancy people call this making a roux, country people call this making a gravy.  Hungry people call this delicious.


Put your chicken and veggies into your pie pan.


Pour your gravy on top.


Place your pie crust on top.  Mine is pitiful, I know!


Bake until golden.


Chicken pot pie is hands down one of the favorite meals in our house.  I love that I can make (and bake) this ahead of time and warm it up for dinner.  I have heard that these freeze well, I will try that soon.  Once I can perfect a pie crust!


Wednesday, September 26, 2012

Walmart Apples

I did a little experiment the other day.  I stopped by this little farmers stand where I have been getting my produce lately to buy some apples.  I was ecstatic to see that they had honey crisp apples, which are our favorites.  Our farmers stand just so happens to be located in the Walmart parking lot.  And it dawned on me that Walmart sells apples too.  So, I ran inside Walmart to purchase a honey crisp apple.  And, I am sad to say, I did not have any people of Walmart moments on that trip, unlike the last time I was at Walmart and the check out girl showed me her hysterectomy scar.

I took the apples home and compared the two.  I was pretty shocked at what I saw.

(organic on the left, Walmart on the right)


(Organic on top, Walmart on the bottom).


My first thought when I compared these two is "what the heck is Sam Walton putting on his apples?"  Now, we all know that apples are on the top of the dirty dozen list because they contain the highest level of pesticides found in produce.  And guess what?  The apples are then dipped in wax to preserve their freshness...essentially, sealing in all those pesticides.  

Buy organic apples.  

Now this would be the perfect time to share my favorite apple recipe with you.  If I had a favorite apple recipe.  We eat ours straight up, so I don't have an apple recipe to share!

I'll make it up to you and share a recipe that contains my mini's two favorite foods, asparagus and bacon.  

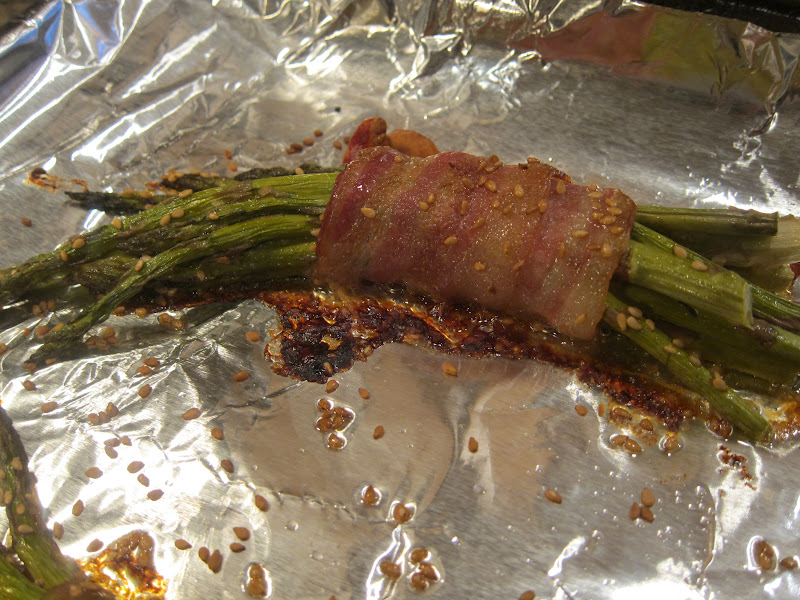
Bacon Wrapped Carmalized Sesame Asparagus

  • 1 bunch of asparagus, about 20-25 spears, stems removed
  • 4 slices thick-cut bacon
  • 1 1/2 tablespoons olive oil
  • 1/2 tablespoon toasted sesame oil
  • 1 1/2 tablespoon brown sugar
  • 1 garlic clove, minced or pressed
  • 1/2 tablespoon toasted sesame seeds

1.  Preheat oven to 400 degrees F. Line a baking sheet with aluminum foil and place a wire rack on top. Spray the rack with nonstick spray. 
2.  In a small bowl, whisk together oils, brown sugar and garlic. Set aside.
3.  Bunch together 5-6 asparagus spears and tightly wrap a piece of bacon around the bundle. 
4.  Place on the wire rack seam-side down and repeat. Using a pastry brush, a spoon or even your hands (I did this…), brush the spears thoroughly with the oil/sugar mixture. Give each bundle a hefty sprinkle of sesame seeds. Roast for 35-40 minutes, or until bacon is crispy. Serve warm.
(I also read an adaptation on Pinterest that you can marinate the spears in italian dressing, wrap in bacon, and then bake).
Wrapped up and ready to bake.


 Finished baking and ready to be enjoyed.


These were delish.  We all loved them.  One of us preferred the bacon over the asparagus spears.  I won't name names, but it's the mini McGhee that wears pigtails and all things sparkly.

Monday, September 24, 2012

Autumn Meal

This weekend was gorgeous.  In fact, this was such a perfect weekend that autumn may be replacing summer as my favorite season.  Here's a few snapshots to show you why.....


Picture overload.  I know, sorry!  But, when your 9 year old mini tells you many times throughout the day that this is "the best day of my life", you want to document that day properly.  And I'm a blogger, so this is how I document things.  And I also encourage everyone to set aside a day and spend it outdoors  with your family.  The exercise (6 miles!), the fresh air, the unplugged-ness, the adventure....it's incredible!

And of course, you will be HUNGRY afterwards!  And naturally, the only meal suitable for the McGhees was a bowl of warm chili.  We had our chili with grilled cheese (colby-jack on Great Harvest honey wheat bread) and served with a side of sweet potatoes.


  • 2 large sweet potatoes, peeled and cubed
  • 2 large cloves garlic, minced
  • 2 tablespoons extra virgin olive oil
  • 2-3 tablespoons Parmesan cheese, finely grated
  • 1/2 teaspoon dried thyme
  • Salt and Pepper to taste

1.  Preheat oven to 400 degrees and position oven rack to middle position. Line the bottom of a large baking sheet with aluminum foil.
2.  In a medium sized bowl, place the prepared, cubed sweet potatoes, garlic, olive oil, Parmesan cheese, dried thyme. Distribute the ingredients evenly to cover the sweet potatoes. Sprinkle with salt and pepper to taste. Transfer the sweet potato mixture to the prepared baking sheet and spread out the potatoes so that they are in a single layer.
3.  Roast in oven for about 40 minutes -OR- until the sweet potatoes can be easily pierced with a sharp knife. Set the oven to broil and broil until the tops of the sweet potatoes start to brown, about 8-10 minutes (keep an eye on the potatoes when broiling, as your time may differ and you want to take care not to burn them).

Cut up your potatoes.


Season your potatoes.


Arrange on a baking sheet in a single layer.


Bake until soft and then broil until browned.


These were delish.  Seriously, seriously tasty.  Everyone in my family loved them.  Everyone except for my middle mini, who hates sweet potatoes.  However, he did mange to eat his portion of sweet potatoes by pretending his was spiderman and using his web-powers to shoot the potatoes directly into his stomach.  And I kind of believe that he could be spiderman....


.....and in case you were wondering, he landed on his feet......