Showing posts with label black beans. Show all posts

Wednesday, May 16, 2012

Rainbows

The key to happiness in life is low standards.

OK, so you all probably know me better than to believe that I really mean that.  But, seriously, isn't it wonderful when you have low standards for something and it turns out great?  I'm referring specifically to food when I say that, of course.

Yesterday, I threw some things in the crockpot and had no clue how it would turn out and low and behold, it was a total hit.  Here's the recipe.

Heids McGhee's low standards crockpot Mexican chicken

  • 2 boneless, skinless chicken breasts
  • 5 chicken legs
  • taco seasoning (I used my homemade seasoning)
  • jar of salsa (I used deli made at my local market)
  • can of black beans
  • 1/2 to 3/4 cup of corn (canned or frozen)
  • cilantro (from my herb garden)
  • chives (from my herb garden)
  • tortillas
  • shredded cheese (Mr. McGhee and I used pepper-jack, the minis used cheddar)
  • sour cream
  • avocado, diced
1.  Put the chicken in the crockpot.  Sprinkle with taco seasoning and pour in salsa.  Stir.  Cook on high until chicken is done.  Mine took about 3.5-4 hours.

2.  Remove chicken and shred.  Return shredded chicken to crockpot and add corn and black beans.  Cook on low another hour.

3.  Serve on tortillas.  Add cheese, fresh cilantro and chives, sour cream, and avocados.


Eat while enjoying the pouring rain and the double rainbow that it brings.  Realize key to happiness is not having low standards, but finding happiness amidst the rain.


Saturday, March 3, 2012

Gardening!

I am so excited I can barely type right now.  I took an organic gardening class today at Angelic Organics.  That means, in my mind, I am now a farmer.  See, look at me, I even dress the part!


Everyone at Angelic Organics is extremely kind and helpful, just like the people at the local natural market.  Seriously, all these people that are down with Mother Nature are so freaking happy. 

Now, I have zero gardening experience, so I am very excited to be planning my garden.  And, I have talked Mr. McGhee into taking a class on accessing your risks and resources in starting a small farm.  There are several reasons why I think we should start an organic farm and I am on a mission to prove to Mr. McGhee based on these reasons.....

1.  We could feed our family.
2.  I could spend my mornings talking about how beautiful my tomatoes are at the farmer's market.
3.  Farming would provide great blogging material.
4.  We live minutes from a large farming store.  I take that as a sign.

And if you're wondering if Mr. McGhee gets tired of all my campaigns?  The answer is yes.  Yes, he does.  Lucky for him, he works 60-70 hours a week, so his face-to-face time with me is limited.  So, for now, we are happily planning our garden....beets, carrots, kale, lettuce, spinach, tomatoes, radishes, garlic, leeks, peppers, basil, rhubarb, strawberries, raspberries, and pumpkin.  A bit lofty, you think?  I probably should call it a farm, rather than a garden, right?

Moving on to dinner.....I have shared this recipe before, but it's worth reposting.  In fact, I'm going to keep posting it because it is delicious and freezes perfectly.  Do yourself a huge favor and make a huge batch of it and freeze the leftovers. 

Mexican Beef
  • 1 (4 pound) frozen rump roast
  • 1 cup white wine
  • 2 (7.75 ounce) cans Mexican style hot tomato sauce
  • 3 tablespoons crushed garlic
  • salt and ground black pepper to taste
  • 1 bunch green onions, chopped
  • 1 cup chopped fresh cilantro
  1. Place the frozen roast in the slow cooker. Pour the wine and Mexican style hot tomato sauce over the top. Season with garlic, and salt and pepper to taste.
  2. Cover, and cook on Low for 9 hours. When done, the roast should shred easily with a fork. Shred the roast into the juices, and mix in the chopped green onions and cilantro.               
Since you have the bottle of wine open, I recommend you pour yourself a glass.  And, since you can't freeze the leftover wine, you may as well finish the bottle. 

I serve this taco meat on tortillas.  You can make your own or be a cheater and buy these:


Flour tortillas
  • 4 cups flour
  • 2 tsp baking powder
  • 1 tsp salt
  • 2 tbsp veg shortening or lard
  • 1 1/2 cups water
1. Mix.
2. Knead.
3. Roll.
4. Cook on hot skillet.


We top ours with cheese, chopped tomatoes, bell peppers, avocado, and sour cream.  I served them with black bean stuffed bell peppers. 


Spicy Black Bean Stuffed Peppers

  • 2 small peppers- any kind you’d like
  • 1/2 medium sized onion, diced
  • 1 clove garlic, minced
  • 1 TBSP olive oil
  • 1, 15 oz can black beans, drained and rinsed
  • 1/4 cup water
  • 2 tsp cumin
  • 2 tsp chili powder
  • 1/2 tsp smoked paprika
  • 1/2 tsp salt
  • pinch cayenne pepper for a little heat
  • 1/2 cup sweet corn
  • 1/2 cup shredded Colby Jack cheese, or any cheese you like
  • fresh cilantro, salsa, and sour cream for serving
  1. Preheat oven to 400°F. Cut a slit through the entire length of each of your peppers. Place them on a baking sheet and roast for 15 minutes, until the skins are softened and beginning to blister.
  2. Heat olive oil in a small saucepan set over medium heat. Add your onion and saute for 3 minutes, until beginning to soften and turn translucent.
  3. Add garlic and stir constantly for 30 seconds, until fragrant.
  4. Stir in your black beans along with the water.
  5. Add your cumin, chili powder, paprika, salt, and cayenne. Stir, cover the pot, reduce the heat to low and simmer the beans for at least 15 minutes, but up to 30 minutes.
  6. Stir in corn. Divide the bean mixture evenly among the two peppers and sprinkle with cheese.
  7. Broil for 3 minutes, until the cheese is melted and bubbling. Garnish with fresh cilantro, salsa, and sour cream if you’d like.
**sidenote** I brushed peppers with olive oil and broiled after step 1 for a couple of minutes. I like my peppers a little charred.

Now, I expect all of you to make a huge batch of the taco meat.  You really should because next week I am going to show you how to turn it into soup.

Now, prepare to be ah-may-zed.  I really out-did myself with dessert.  The other day I bought dried mangos from the local natural market.  Now, these are not a bag of factory-dried mangos, these are mangos dried at the market.  They are absolutely delish.  And now I am convinced I need a food dehydrator.  So, that means the birthday wish list is now....food processor, VitaMix, food dehydrator, iPod, sports watch, and a designer handbag. So, you're probably wondering if Heids McGhee is a greedy, materialistic person.  And the answer yes.  Yes, I am.  I can't help it, I like things.  Particularly shiny things.  I also want a puppy.  See, I'm not materialistic and heartless.  But you better believe, if I get that puppy, I am totally putting it in this.

So, back to dessert.......
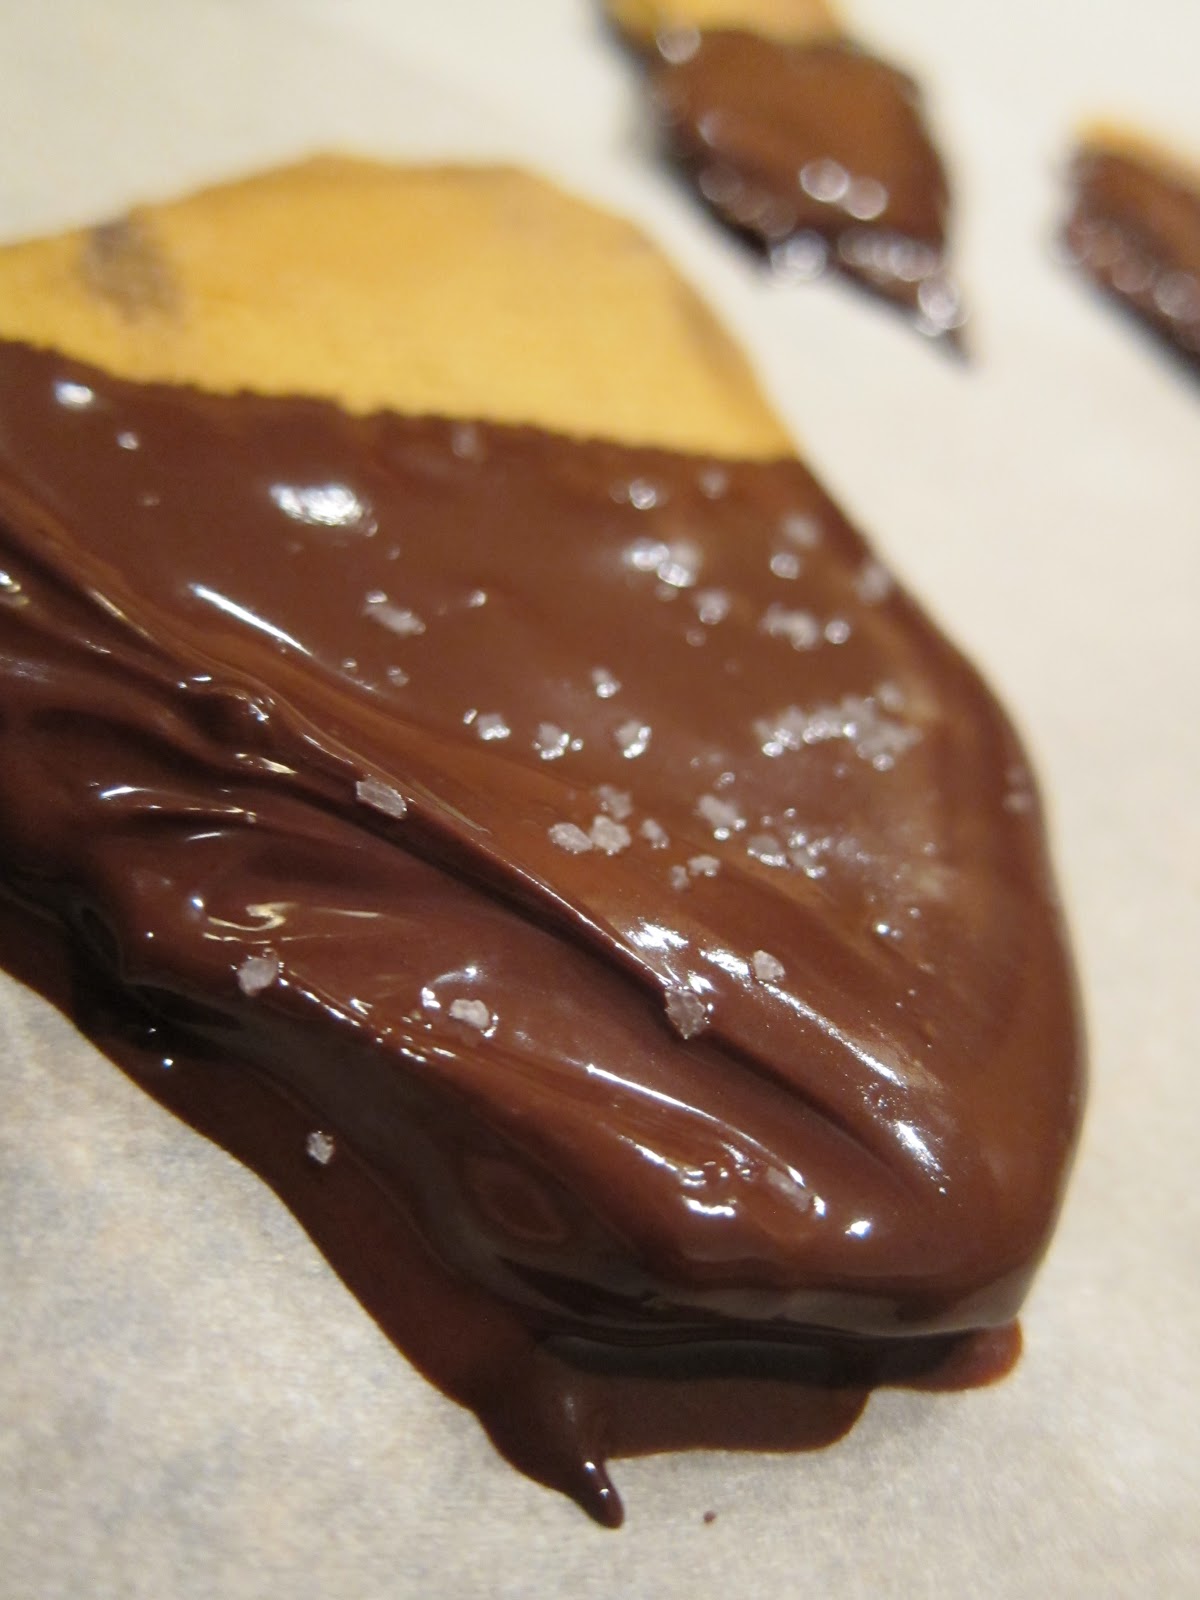
Chocolate Mangos
  • dried mangos (HIGHLY recommend finding real fresh dried mangos)
  • dark chocolate
  • kosher (or sea) salt
1.  Melt dark chocolate in double broiler (or microwave).
2.  Dip mango in melted chocolate.
3.  Lay on sheet of parchment paper.
4.  Sprinkle with salt.

These are delish.  Like so delish, you will have to hide in the pantry to eat them. 


And, finally, I want to share an after school snack that was a total hit with the minis the other day.  I found cinnamon-whipped honey at Great Harvest.  The ingredients are honey and cinnamon.  Although it isn't local honey, I decided to live a little and buy it anyway.  Great decision.


Apple Sandwich
  • 2 apples, cored and sliced
  • natural peanut butter
  • honey
  • raisins
1.  Spread peanut butter on apple slice.
2.  Spread honey on apple slice.
3.  Sprinkle raisons on peanut butter.
4.  Sandwich two apple slices together.


Delish!  Have a great night, I am off to bed.....you know us farmers, early to bed, early to rise!

Wednesday, February 22, 2012

Busy dinner night

Who here has a busy family?  Much to my dismay, the mini McGhees are way too busy.  See, I would prefer to pick the minis up from school, come home to a homemade snack, ride bikes, play board games, do an art project, eat dinner, take baths/showers, read, pray, bedtime.  You know, end our nights with one of those "Good Night Jon-boy" moments from the show, The Waltons.  Our real life is more like this, pick kids up from school, shove snack down their throats in the car, yoga lesson, therapy session, golf lesson, swim practice, soccer practice, baseball tryouts, homework, dinner, sniff-test (oh, you're fine, no showers tonight!), read, pray, collapse in bed in a state of exhaustion with shouts of "we said good night, that means we don't need to see you until it's time to say good morning." 

And I don't see life slowing down anytime soon, as I have minis chasing dreams of becoming the next great swimmer/baseball player/soccer player/yogi/golfer.  And if those dreams don't work out, my minis want to work at a smoothie shop when they grow up.  And live in an RV on the beach.  I'm all like, "dude, if you can find out a way to make that work, go for it."  My dreams are to find a way to help provide for my family without ever having to leave the comfort of my own home.  So, to me, an RV on the beach sounds like a lofty goal.

Today is Wednesday which means we will be eating an early dinner before swim practice and then coming home and having a snack afterwards.  Dinner will be tortillas with hummus and black bean stuffed bell peppers.  I got the hummus recipe from Mr. HPT.   

I won't have the time to make homemade tortillas, so we will eating these raw tortillas.


Hummus
  • 2 cans garbanzo beans
  • 2 tbsp minced garlic
  • 6 dashes cayenne pepper
  • 3 tbsp lemon juice
  • 3 dashes cumin
  • 3 tbsp olive oil
1.  Drain most of juice from garbanzo beans.
2.  Place beans in Pyrex dish or equivalent and spread out evenly.
3.  Place in oven at 375 degrees for approximately 15 minutes.
4.  Remove from oven and place in blender or food processor with other ingredients.
5.  Blend until smooth.


I added a bit of tahini and a pinch of kosher salt.  I don't have a fancy food processor, so I needed to thin mine out a big with the juice from the garanzo beans.
Spicy Black Bean Stuffed Peppers
First step is to roast your peppers.  You can do this ahead of time.  You can also make extras.  I love to mix roasted red peppers in with my scrambled eggs or on top of salads. 
1.  Coat bell peppers generously with olive oil. Put them on a baking sheet and broil them under flame until they begin to turn black. Turn peppers until each side has been blackened. Remove from baking sheet and place in a bowl. Cover bowl with saran wrap. 


2.  Let the peppers sit for a while, at least 30 minutes. Take peppers out of jar and pull stem off. Dig inside of pepper and remove the seeds.


3.  Carefully peel the outer skin off of the pepper.


4.  After peppers are all peeled, set aside. Resist all temptation to eat them. They're worth the wait.


Next step is to make the black bean stuffing.


  • 1/2 medium sized onion, diced
  • 1 clove garlic, minced
  • 1 TBSP olive oil
  • 15 oz can black beans, drained and rinsed
  • 1/4 cup water
  • 2 tsp cumin
  • 2 tsp chili powder
  • 1/2 tsp smoked paprika
  • 1/2 tsp salt
  • pinch cayenne pepper for a little heat
  • 1/2 cup sweet corn
  • 1/2 cup shredded Colby Jack cheese, or any cheese you like
  • fresh cilantro, salsa, and sour cream for serving 

    1. Heat olive oil in a small saucepan set over medium heat. Add your onion and saute for 3 minutes, until beginning to soften and turn translucent.
    2. Add garlic and stir constantly for 30 seconds, until fragrant.
    3. Stir in your black beans along with the water.
    4. Add your cumin, chili powder, paprika, salt, and cayenne. Stir, cover the pot, reduce the heat to low and simmer the beans for at least 15 minutes, but up to 30 minutes.
    5. Stir in corn. Divide the bean mixture evenly among the two peppers and sprinkle with cheese.
    6. Broil for 3 minutes, until the cheese is melted and bubbling. Garnish with fresh cilantro, salsa, and sour cream if you’d like. 
    Just a tip, make a double or triple batch of the beans and once they are cooled, stick them in a freezer bag.  These freeze very well and are a blessing on those, "oh *&#@, what's for dinner?" nights. 

    After swim practice, we will most likely come home and have pomegranate smoothies (the minis are obsessed with those right now) and popcorn.

    Ingredients:
    • 1/2 cup pomegranate juice
    • 1/2 banana (I freeze brown bananas and they are perfect for smoothies)
    • 5 strawberries
    • 1/2 cup yogurt (please use plain, I used my homemade yogurt)
    • 1 tbsp ground flaxseed
    Directions:
    Put all ingredients in a blender, and blend until desired consistency is reached.


    Monday, January 30, 2012

    A dinner for the minis

    Mr. McGhee will not be around this week, as he is busy working.  And, while he's working, I am stuck at home with the 3 mini McGhees....and to be honest, there is no place I would rather be!  I don't know about you guys, but I am a homebody and I've got 3 minis that still argue over who gets to sit on my lap.  I have got to make sure I enjoy these years, right?!?  So, this week, while the minis are in school, I will be working hard in the kitchen to make "kid choice" snacks, dinners, and treats. 

    Here's the thing, cooking for kids is a balance between giving them healthy options, but also giving them options that they will actually eat.  I was blessed with minis that eat fruits and veggies first.  Our struggle with the minis is getting them to eat meals.  This week, I am hoping to rework some meals to make them appealing to the minis, but still nutritious enough to satisfy me. 

    First up is bread.  I have heard that my readers' minis are resisting the original honey wheat bread recipe that I posted.  I have to admit, I kind of get where your minis are coming from.  Because I am determined to make my own bread, I decided to try a new honey wheat bread recipe that I found on allrecipes.com. 

    • 1 1/8 cups water
    • 3 cups whole wheat flour
    • 1 1/2 teaspoons salt
    • 1/3 cup honey
    • 1 tablespoon dry milk powder
    • 1 1/2 tablespoons shortening
    • 1 1/2 teaspoons active dry yeast
    1. Place ingredients in bread machine pan in the order suggested by the manufacturer. Select Whole Wheat setting, and then press Start.               

    OK, now don't anybody go and have a stroke, but I didn't use 3 cups of whole wheat flour.  I used 2 cups of whole wheat flour and one cup of bread flour.  Bread flour on the left, milk powder on the right.


    And, the shortening.....yes, I used shortening even though I am morally opposed to anything with the word hydrogenated on it.  I think shortening is gross and has absolutely zero nutritional quality to it.  However, if it can do something to the texture and flavor of the bread to make it more palatable for the minis, I will give it a try.  I do plan on reworking this recipe and trying to substitute coconut oil for the shortening, but for this round....I did use shortening.

    You should have seen me in the store buying shortening.  I did one of those look both ways, make sure nobody was looking, sprint down the aisle, grab the shortening, shove it in the cart behind the swiss card, beets, and organic apples and pray to God that nobody sees it moves.  Honestly, I was waiting for an announcement to be made over the PA system at the grocery store, "Heids McGhee is a fake, she has just been spotted with shortening". 

    I can't bear to look at the label to see how many ingredients are in the shortening, but I promise you it's processed.  Hydrogenation is a process in which the food industry adds hydrogen to unsaturated fats to make saturated fats.  You want to avoid hydrogenated food as much as possible. 

    So, the verdict is....the bread is yummy!  Even though, nutritionally, I am not thrilled with the trade-offs I had to make, the minis love it.  In fact, the oldest mini said, "Mom, this tastes just like Great Harvest bread.  Mom!  Mom!  Mom?  Why are you crying.....?"  Yeah, I totally had a moment.


    I also wanted to have a delish snack ready for the minis when they came home from school today, so I made a couple batches of muffins.  I followed this recipe


    • 2 cups whole wheat flour
    • 1 cup all purpose flour
    • 1 cup packed brown sugar
    • 2.5 teaspoons pumpkin pie spice
    • 1.5 teaspoons baking powder
    • 1 teaspoon baking soda
    • 1 teaspoon salt
    • 4 eggs
    • 1.5-2 cups pumpkin puree
    • 1/3 cup vegetable oil
    • 1/3 cup applesauce
    • 1/3 cup coconut oil (melted slightly)
    • 1 cup honey
    1. Preheat oven to 350 degrees F.
    2. In a bowl mix flours, brown sugar, pumpkin pie spice, baking powder, baking soda, and salt.
    3. In a separate bowl, mix eggs, pumpkin, oil, applesauce, coconut oil, and honey.
    4. Make a well in the dry ingredients and pour wet ingredients into well. Mix just until the dry ingredients are absorbed. DO NOT OVERMIX.
    5. Bake until a toothpick comes out clean.
    I didn't add the pumpkin in step 2.  After step 4, I divided the batter into 2 bowls.  Into one bowl, I added pumpkin, into the other bowl, I added mashed bananas.  I also added chocolate chips.  See?  I totally know how to kick back and let loose. 


    And, for dinner tonight we had taquitos.  In our house, taquitos are definitely a "kid choice" dinner.  I had an unfortunate experience with taquitos when I was pregnant with my oldest mini, so I really do not enjoy eating him....yet, he loves them?  That doesn't make sense to me?!?!?  I followed a recipe from our best bites. 

    Creamy chicken taquitos

    1/3 C (3 oz) cream cheese
    1/4 C green salsa
    1T fresh lime juice
    1/2 t cumin
    1 t chili powder
    1/2 t onion powder
    1/4 t granulated garlic, or garlic powder
    3 T chopped cilantro
    2 T sliced green onions
    2 C shredded cooked chicken (for extra yumminess, use grilled taco chicken!)
    1 C grated pepperjack cheese

    small corn tortillas (and actually, flour ones are really good as well)
    kosher salt
    cooking spray

    1.  Heat oven to 425. Line a baking sheet with foil and lightly coat with cooking spray.

    2.  Heat cream cheese in the microwave for about 20-30 seconds so it’s soft and easy to stir. Add green salsa, lime juice, cumin, chili powder, onion powder and granulated garlic. Stir to combine and then add cilantro and green onions. Add chicken and cheese and combine well.
    You can prepare up to this step ahead of time. Just keep the mixture in the fridge.

    3.  Work with a few tortillas at a time and heat in the microwave until they are soft enough to roll without cracking. It helps to place them between damp paper towels. Usually 20-30 seconds will do it. If you find yours are cracking when you roll them or are coming unrolled right away, just try heating them longer and try the paper towel thing.

    4.  Place 2-3 T of chicken mixture on the lower third of a tortilla, keeping it about 1/2 inch from the edges.

    5.  Then roll it up as tight as you can.

    6.  Place seam side down on the baking sheet. Lay all of the taquitos on the baking sheet and make sure they are not touching each other. Spray the tops lightly with cooking spray or an oil mister and sprinkle some kosher salt on top.

    7.  Place pan in oven and bake for 15-20 minutes or until crisp and the ends start to get golden brown.

    A word of advice....DO NOT forget to sprinkle the kosher salt on top.  I have forgotten before, and there really is a difference in the flavor. 


    I served it with a side of black beans.

  • 1/2 medium sized onion, diced
  • 1 clove garlic, minced
  • 1 TBSP olive oil
  • 1, 15 oz can black beans, drained and rinsed
  • 1/4 cup water
  • 2 tsp cumin
  • 2 tsp chili powder
  • 1/2 tsp smoked paprika
  • 1/2 tsp salt
  • pinch cayenne pepper for a little heat

    1. Heat olive oil in a small saucepan set over medium heat. Add your onion and saute for 3 minutes, until beginning to soften and turn translucent.
    2. Add garlic and stir constantly for 30 seconds, until fragrant.
    3. Stir in your black beans along with the water.
    4. Add your cumin, chili powder, paprika, salt, and cayenne. Stir, cover the pot, reduce the heat to low and simmer the beans for at least 15 minutes, but up to 30 minutes

    Looking forward to this week!  I've got some neat things planned that I am hoping the minis love!  And, for those of you worried about Mr. McGhee, I will make sure I find a way to get him my delish home-cooked food, no drive-through for him!

    Friday, January 27, 2012

    Lunch Lady!

    So, yesterday's post has gotten rave reviews.  I have gotten several messages from readers that are excited to have their own Tuesday tomato soup and grilled cheese dinner at home.  And, I had many readers that loved walking down memory lane with me to revisit school lunches....so in honor of all of you, here's one of my favorite Adam Sandler videos.  And from now on, I am Heids McGhee, aspiring lunch lady.  Are you thinking, "Heids McGhee, unprocessed kitchen, blogger, biker, and lunch lady....how do you do it all?"  Well, the answer is, I am an overachiever by nature.

    **sidenote**  You may not want to watch this video with your children.  My kids think it is hilarious, but I have questionable parenting at times.


    So, today is Friday.  To me, Fridays scream cocktails Mexican food.  Tonight's dinner is going to be a breeze because the bulk of dinner is frozen in my freezer.  Remember the crockpot bean recipe from last week?  I froze half of that batch.  As I was pulling the beans out of the freezer, I saw a bag of frozen taco meat from a party we had in December and a bag of frozen corn. 


    So, I thawed and reheated the frozen taco meat. It was even better this time.  I got the recipe from allrecipes.com.

    Taco meat
    • 1 (4 pound) frozen rump roast
    • 1 cup white wine
    • 2 (7.75 ounce) cans Mexican style hot tomato sauce
    • 3 tablespoons crushed garlic
    • salt and ground black pepper to taste
    • 1 bunch green onions, chopped
    • 1 cup chopped fresh cilantro        
    **sidenote**  I never found hot tomato sauce.  I used regular tomato sauce and added some diced jalapenos and onion. 
    1. Place the frozen roast in the slow cooker. Pour the wine and Mexican style hot tomato sauce over the top. Season with garlic, and salt and pepper to taste.
    2. Cover, and cook on Low for 9 hours. When done, the roast should shred easily with a fork. Shred the roast into the juices, and mix in the chopped green onions and cilantro.               

    Serve on tortillas with cheese, lettuce, tomato, peppers, etc. 

    And, even though I am stretching myself a little too thin with the new lunch lady/biker/blogger roles I am taking on, I thought I really should make something homemade for this meal.  So, I decided to finally tackle homemade tortillas.  I got this recipe from my friend, Deb.  Deb has a 7 year old and 5 year old triplets and makes her own tortillas.  We're putting her up there with Astrid, in the "women who have more hours in their day than the rest of us" club.

    Flour tortillas

    • 4 cups flour
    • 2 tsp baking powder
    • 1 tsp salt
    • 2 tbsp veg shortening or lard
    • 1 1/2 cups water
    1.  Mix.
    2.  Knead.
    3.  Roll. 
    4.  Cook on hot skillet.

    Seriously, how can you not love the directions in Deb's recipe?  I'm thinking Deb has triplets, she could assign steps #1-3 to them, step #4 to the 7 year old and pour herself a cocktail fresh squeezed juice and supervise. 

    I know if I was going to be all healthy, I would have used whole wheat flour.  But, today is Friday Funday, so we got all crazy in the McGhee house and used all purpose.  And, don't you love the looks of these....screaming homemade!!!!


    When I was scrounging in the freezer for beans and meat, I noticed a bag of frozen corn.  Now, this isn't frozen corn you buy in the grocery store...this is corn that I froze.  There's a difference.  Where I live, in the Middle, we have really amazing sweet corn in the summer.  Anytime there is leftovers I cut it off the cob and freeze it.  Brilliant, I know!  So, I got to thinking about what could I do with this corn, and then I remembered this recipe from canyoustayfordinner.com that I have been wanting to try. 


    Spicy Black Bean Stuffed Peppers

    • 2 small peppers- any kind you’d like
    • 1/2 medium sized onion, diced
    • 1 clove garlic, minced
    • 1 TBSP olive oil
    • 1, 15 oz can black beans, drained and rinsed
    • 1/4 cup water
    • 2 tsp cumin
    • 2 tsp chili powder
    • 1/2 tsp smoked paprika
    • 1/2 tsp salt
    • pinch cayenne pepper for a little heat
    • 1/2 cup sweet corn
    • 1/2 cup shredded Colby Jack cheese, or any cheese you like
    • fresh cilantro, salsa, and sour cream for serving
    1. Preheat oven to 400°F. Cut a slit through the entire length of each of your peppers. Place them on a baking sheet and roast for 15 minutes, until the skins are softened and beginning to blister.
    2. Heat olive oil in a small saucepan set over medium heat. Add your onion and saute for 3 minutes, until beginning to soften and turn translucent.
    3. Add garlic and stir constantly for 30 seconds, until fragrant.
    4. Stir in your black beans along with the water.
    5. Add your cumin, chili powder, paprika, salt, and cayenne. Stir, cover the pot, reduce the heat to low and simmer the beans for at least 15 minutes, but up to 30 minutes.
    6. Stir in corn. Divide the bean mixture evenly among the two peppers and sprinkle with cheese.
    7. Broil for 3 minutes, until the cheese is melted and bubbling. Garnish with fresh cilantro, salsa, and sour cream if you’d like.
    **sidenote** I brushed peppers with olive oil and broiled after step 1 for a couple of minutes.  I like my peppers a little charred. 


    Oh.  My.  Goodness.  These peppers were so good. 


    Delish!