Thursday, December 20, 2012

Award Winning Pasta

Like everyone else in America, I am devastated.  heartbroken.  grieving.  

In the past few days, I have sat here and typed out several blog posts.  I've deleted them all.  I've decided that people read my blog for the goofy, silly anecdotes of the McGhee family and for the unprocessed recipes of Heids McGhee.  Although I am the person behind Heids McGhee, Heids McGhee is really a small part of who I am......and I will keep this blog solely the thoughts and words of Heids McGhee.  

So all Heids McGhee has to offer right now is saddness and prayer for the families involved in the Newtown shooting.  Like everyone else in America, when I heard the account of what happened last Friday, I had an overwhelming sense to grab my family and hold on tight.  Nothing else seems important any more.  And, in honor of those beautiful children and adults, I will do my best to continue live my life in this way.


My Mr. and minis are awesome.  And according to them, I'm awesome too.  In fact, the other night I earned  the "best mommy in the whole entire universe and beyond because you know mom, there may be life on other planets" award.

And I'm going to share with you how I did it.  And you're going to be really happy when you read how I did it because it's very simple and fool-proof.  Unless, of course, you can't boil water.  Then you're in trouble.

Creamy Garlic Pasta.  What's not to love.  Garlic.  Pasta.  And Cream.  I found the recipe here.

Creamy Garlic Pasta
  • 2 tsp olive oil
  • 4 cloves garlic, minced
  • 2 tbsp butter
  • ¼  tsp salt
  • ½ tsp pepper
  • 3 cups chicken stock
  • ½ lb spaghetti or angel hair pasta
  • 1 cup grated parmesan cheese
  • ¾ cup heavy cream (I used whole milk)
  • 2 tbsp chopped fresh parsley

1.  In a pot, bring the olive oil to medium-low heat. Add the garlic and stir, allowing it to cook for 1-2 minutes. 
2.  Mix in the butter until melted. Add the salt, pepper and chicken stock. Raise the heat to high and let it come to a boil. 
3.  Once it is at a rolling boil, add the pasta and cook for as long as the box’s directions indicate. 

4.  Reduce the stove to medium heat and mix in the parmesan until completely melted. Turn off the heat and stir in the cream and parsley.

This is so easy.....dare I say, even the Mr. could make it!  

Olive oil, garlic, and butter.  


Add your spices and chicken stock.


Boil those noodles.


Add your cheese and milk.


Stir, add parsley, and serve.  We ate our pasta with meatballs.


I had to capture this moment.  Clean plate!!!!!


I told my minis that moms that receive the "best mommy in the whole entire universe and beyond because you know mom, there may be life on other planets" award, don't do dishes.  So I layed on the couch while my minis cleaned up and then went upstairs to bathe and tuck each other into bed.  True story.

Wednesday, December 12, 2012

Food coloring?!?!?

I try to keep things funny and light-hearted around here, but today I wanted to ask you to take a few minutes to read this in lieu of reading my rambling stories about my goofy family.

I know that I have been labeled a "health food nut" by most of you, but you don't have to be an extremist like I am to be upset by that information.  I urge you to think carefully about eating and serving food that is chock full of food coloring.  Here are some safer options that I have posted in the past....

And you guys know that I can't leave you without a new recipe for the day, so I thought I would share my new favorite veggie dish with you.

Zucchini and Carrot sticks
  • 2 zucchini (sliced into sticks)
  • 5-6 large carrots (peeled and cut into sticks)
  • sea salt
  • pepper
  • italian seasoning (or any seasoning of your choice)
  • olive oil spray (or cooking spray of your choice)
  • olive oil
1.  Preheat oven to 425.
2.  Line a baking sheet with waxed paper.
3.  Spray waxed paper with olive oil spray.
4.  Put your sliced veggies in a large bowl.  Drizzle with olive oil (no need to over-drizzle).  Season with salt, pepper, and seasoning.
5.  Lay out on the cooking sheet.
6.  Cook for about 20 minutes or until golden in color.  Flip the veggies halfway through cooking time. 

Slice your veggies and drizzle with oil.


Season your veggies and lay out on your baking sheet.


Bake until golden.


These veggies are delish!!!  We all loved them!  I particularly enjoyed them the next day along with a cup of brown rice.

Monday, December 10, 2012

Crockpot soup

We recently took our annual trip to the tree farm to cut down our Christmas tree.  For those of my green-crunchy-granola-tree-hugging readers, I apologize.  I know.  I struggle with the idea of cutting down a mature tree, for the sake of it dying a slow, albeit wonderfully decorated, life.

That being said, I love a real Christmas tree.  And I love the tradition of picking our tree with my family.  And I love watching Clark Griswold Mr. McGhee spend hours struggling to fit the "I-told-you-that-tree-would-never-fit-in-our-house" Christmas tree into the tree stand.  

This is the tree I picked.


This is the tree Mr. McGhee and the boys chose.


The boys won.  But in the end, the girls won.  Because we got to sit and sip our coffee and watch the struggle unfold.


After a long day of Christmas tree choosing, sawing, standing, and decorating, it was only natural that we wind down with a steamy bowl of homemade chicken noodle soup.

Crockpot Chicken Noodle Soup (Just a note....you will need to start your soup the day before you actually want to eat it.
  • one package of chicken legs
  • one package of chicken thighs
  • 8-16 cups of water (it really just depends on how much your crockpot can hold)
  • 1 medium sized onion, diced
  • 6 stalks celery, diced
  • 8 carrots, peeled and diced
  • sage
  • thyme
  • rosemary
  • salt
  • noodles (I used spaghetti, cut into 1 inch pieces)
1.  Put the chicken, water, onion, celery, carrots, sage, thyme, rosemary and salt in your crockpot.  Cook on low all day.  Salt throughout the day.

2.  Strain your chicken stock into a pot and store it in the fridge overnight.  Pick the chicken off the bones and store chicken with cooked veggies in a container in the fridge overnight.

3.  Skim the fat off your chicken stock (mine was solid, sort of a jelly consistency).  Put it back in the crockpot and heat until warm.  Add your chicken and veggies in and let simmer all day on low.  

4.  Before serving, cook noodles on the stove and toss them in the crockpot. 

Fill your crockpot with chicken, veggies, and spices.  Cook all day.  Salt throughout the day. 


After 8-10 hours your chicken should be cooked and floating in a golden stock.


Drain the stock and set both the stock and the veggies and shredded chicken in the fridge overnight.


After you skim your fat off the stock, warm it up and all chicken/veggies/spices back in.  Cook on low all day in the crockpot.


Add cooked noodles before you serve.


This soup was a HUGE HUGE HUGE hit in the McGhee house.  My child that can not be pleased picky eater ate three bowls that night!  I served it with dinner rolls from Great Harvest.

Friday, December 7, 2012

Par-Tay!!!!

Whenever I am invited to a party, my goal is to be the girl that everyone is talking about at the party.  And, by that, I do not mean I want to be like this girl.....


....but, rather, more like this girl.....


It's true.  I love taking a dish to pass that ends up being the "hit" dish of the night.  You know the dish that you overhear everyone saying, "who made that?"  And then I just sit there pretending like I didn't hear them until someone points at me.  At which point, I casually shrug and claim it is "so easy to make" and "anyone can make it."  But secretly we all know.  It's a Heids McGhee special.  

Usually my guacamole reigns, but this week I think I have found a new contender.

I got this spinach and artichoke dip recipe from the Pioneer Woman.  She is a blogger, author, photographer, tv show hoster that I have been idolizing for years.  And I am nearly positive she has never been arrested for fighting.  Especially on November 29th, like our friend Lindsey was.  The Pioneer Woman is still busy cleaning up her Thanksgving dinner.

Spinach Artichoke Dip
  • 3 Tablespoons Butter
  • 4 Tablespoons Garlic, Minced
  • 1 bag Spinach
  • Salt And Pepper, to taste
  • 2 cans Artichoke Hearts, Rinsed And Drained
  • 3 Tablespoons Butter (additional)
  • 3 Tablespoons Flour
  • 1-1/2 cup Whole Milk (more If Needed)
  • 1 package (8 Ounce) Softened Cream Cheese
  • 1/2 cup Crumbled Feta
  • 1/2 cup Grated Parmesan
  • 3/4 cups Grated Pepper Jack Cheese
  • 1/4 teaspoon Cayenne
  • Extra Grated Pepper Jack
  • Pita Wedges, Tortilla Chips, Crackers
1.  Melt 3 tablespoons butter in a skillet over medium heat. Add the minced garlic and cook for a couple of minutes. Crank up the heat a bit and throw in the spinach. Stir around and cook for a couple of minutes until the spinach wilts. Remove the spinach from the skillet and put it in a small strainer. Squeeze the excess juice back into the skillet. Set the spinach aside.
2.  Throw in the artichokes and cook over medium high heat for several minutes, until liquid is cooked off and artichokes start to get a little color. Remove the artichokes.
3.  In the same skillet or a different pot, melt 3 additional tablespoons of butter and whisk in 3 tablespoons of flour until it makes a paste. Cook over medium-low heat for a minute or two, then pour in milk. Stir and cook until slightly thickened; splash in more milk if needed.
4.  Add cream cheese, feta, Parmesan, pepper jack, and cayenne and stir until cheese are melted and sauce is smooth. Chop artichokes and spinach and add to the sauce. Stir to combine.
5.  Pour into buttered baking dish. Top with extra grated pepper jack and bake at 375 for 15 minutes, or until cheese is melted and bubbly.
Cook your spinach until it is wilted.


Strain your spinach, save your juice to cook your artichokes.


Cook your artichokes until they are browned.


Make your paste (fancy people call it a roux, Pioneer Woman ain't fancy and Heids McGhee ain't either!)  On a side note, even though I am not fancy, the words "ain't" really bothers me and I spent 5 minutes debating whether to use it or not.


Did I mention this is not a low-fat dish?  


Dump those delicious cheeeses into your roux and stir until melted.


Stir in your spinach and artichoke.  Pour into a dish and bake until bubbly and brown.


I served my spinach and artichoke dip with veggies.  Voila!  Suddenly, it's a healthy AND delish dish!  Perfect for all those holiday parties and you can relish in being the lady (or gentleman) that everyone is talking about!

Tuesday, December 4, 2012

Fah-HEE-tahs

The other day, I invited a friend over for dinner.  I won't name names, but this particular friend is gluten-free, lactose-intolerant, and vegetarian.  

Um, yeah.  If you are gluten-free, lactose-intolerant, and vegetarian and a friend offers to cook for you, then you've got yourself a true friend.  You know, not one of these friends.....


So I decided to make my friend vegetable fajitas served on corn tortillas.  You could certainly add any protein of your choice (steak, chicken, pork, seafood) to make a non-vegetarian version.  

Vegetable Fajitas (pronounced Fah-HEE-tah......I'm talking to you Dad.  No more humiliating me at Mexican restaurants)


  • 2 tbsp vegetable oil
  • 1 onion, thinly sliced
  • 1-2 bell peppers sliced, use all colors
  • 1 teaspoon minced garlic (I used at least 2 tsp)
  • 1 yellow squash, halved and sliced into strips
  • 1/2 cup salsa (I used homemade green tomatillo salsa from my local market)
  • 1 tsp ground cumin
  • 1/2 tsp sea salt
  • 1 cup shredded cheese (used pepper jack for some kick)
  • 1/4 cup chopped fresh cilantro
1.  In a 10 inch skillet, heat oil over medium high heat. Add onions, peppers, and garlic; stir to coat with oil. Cover, reduce heat to medium, and cook for 5 minutes. 

2.  Stir squash into vegetables. Stir in salsa, cumin, and salt. Cover, and cook for 5 minutes.

3.  Spoon vegetable mixture evenly down the centers of warm tortillas, and sprinkle with cheese and cilantro. Roll up tortillas, and serve.


This recipe is simple.  COok all your veggies and serve them hot with cheese and cilantro on a tortilla.


I also topped ours with sour cream and my famous Heids McGhee guac.


Simple.  Delish.  Best served with good friends and cold margaritas.


    Wednesday, November 28, 2012

    Chicken Night!

    On November 1st, my tiny mini was having calendar time at preschool.  Her teacher asked the class, "It's November, does anyone know what holiday is in November?"  To which my tiny mini shouted, "Chicken Night!"

    Or Turkey Day.  Close enough.

    In the past, I have made a complete Thanksgiving dinner following the Pioneer Woman's recipes.  Her turkey, mashed potatoes, and stuffing recipes are to.die.for.  Seriously, if I were dying and could request you to make me one last meal, that would be it.  Of course, if you didn't have an entire day to cook that one last meal for me, I would settle for Cheez-Its, twizzlers, and a McDonald's Diet Coke.

    This year my mom invited the McGhee family over for Thanksgiving.  And, while I would love to share all of her recipes with you, I can't.  Because my mom is one of those cooks that doesn't follow recipes, rather she just adds a little of "this" and a little of "that" along with a few sticks of butter and it tastes amazing.  

    So the only Thanksgiving recipe I have to share with you today is a vegetable dish I have been making for years at Thanksgiving.  I only make this dish once a year, because it's one of those dishes that is really dessert disguised as a vegetable.  

    Now, I saw that the week before Thanksgiving there was a "best-squash-ever" recipe floating around on pinterest.  Well, this is what I have to say about that.  I am over pinterest's "best _____ ever" recipes.  I have now tried at least 10 of them and have sadly discovered that they are all average, at best.  So, don't trust what you see on pinterest.  But, you can trust Heids McGhee.  If you're looking for a side dish that resembles a vegetable, but tastes like a dessert, here you go....

    Squash casserole (I apologize to the source of this recipe. I have this saved on my computer from 7 years ago and can't track down where I got the recipe....I publicly admit that this deliciousness is not my own work).
    • 1 butternut squash
    • 1 cup white sugar
    • 1 1/2 cups milk
    • 1 teaspoon vanilla extract
    • 1 pinch salt
    • 2 tablespoons all-purpose flour
    • 3 eggs
    • 1/4 cup butter, melted         
    Topping
    • 1/2 (16 ounce) package vanilla wafers, crushed
    • 1/2 cup butter, melted
    • 1 cup brown sugar
    1.  Preheat oven to 425 degrees F (220 degrees C).
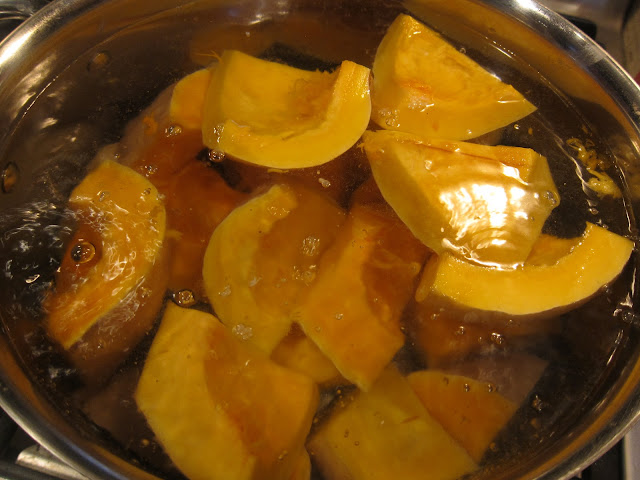
    2.  Put butternut squash in the microwave and cook on high, until soft, 2 to 3 minutes. Cut in half, scoop out seeds and cube. Bring a large pot of water to a boil. Add squash and cook until tender, about 15 minutes. Drain and mash.
    3.  In a 9x13 inch casserole dish combine 3 cups mashed butternut squash, white sugar, milk, vanilla extract, salt, flour, eggs and 1/4 cup melted margarine.
    4.  Bake in preheated oven for 45 minutes, or until set.
    5.  In a medium bowl combine crushed vanilla wafers, 1/2 cup melted margarine and brown sugar. Crumble over top of cooked casserole and return to oven to brown.

    I feel at this point, there are a few things I need to address.  #1.  Yes, that is processed Nilla Wafers.  #2.  Yes, that is a heck of a lot of butter.  #3.  Yes, that is a heck of a lot of sugar.

    In my defense, I warned you...this is more dessert than veggie.  And guess what?  Eating veggies that taste like dessert make people happy.  And isn't that what Thanksgiving is all about?  Isn't that how those suffering pilgrims were hoping we would celebrate their pilgrimage?

    Here's your squash, softened and ready to be cut into cubes.  


     Boil the squash until tender.


    Mix your ingredients.


    Scrape out the squash....


    ....and mash.


    Add your other ingredients to the squash.


    Pour into a dish and bake.  


    While squash is baking, run around like a chicken with your head cut off getting minis showered and into their coordinating outfits.  Mop the bathroom floor, since the middle mini forgot to close the curtain while showering.  Change tiny mini's outfit after she wipes pink toothpaste all over it.  Then, realize boy minis need to be changed too, in order to keep them all coordinating.  Question Mr. McGhee's time management skills (really?  an hour to pack some beer in the cooler?)  Pause to watch Macy's Day parade.  

    At this point, your squash should be firm and done baking.  Prepare your topping and add to the squash.  Return to the oven for a few minutes.  I did all of this, I promise.  Somehow I managed to forget to take pictures of the finished squash.  I also have zero pictures of my minis from Thanksgiving day, which is actually a good thing because if I did, then you would realize I was lying about the coordinating outfits.  

    Happy eating!

    Monday, November 26, 2012

    The Upside of Excess

    My best friend posted this on Facebook the other day and I wanted to pass this on.  PLEASE take the time to read this.....

    The Upside of Excess (from DailyWorth)

    We've all heard the advice, especially this time of year: Get enough sleep, don't overdo the cocktails, or the pre-holiday sale spending sprees.

    In other words, strive for balance—in your diet, life, and finances. Because then all will be well, right? You'll be happy, solvent, thin and Zen.

    Or not. How many busy, creative, passionate women do you know who 

    have figured out the perfect equation of work, rest and fun? Who never stay up too late, have one too many glasses of wine, plow through a pint of ice cream in a single sitting, or buy a pair of cute shoes they don't need?

    OK, maybe you know one woman like that, but she's probably kind of boring. Or you hate her. What’s crazy is that living a balanced life is supposed to make us all feel less stressed, so we strive for it—then get stressed out when we fail.

    Let yourself off the hook about the balance thing. Right now. Sometimes, you've just got to have those shoes. Or ice cream. Or a whole day without the kids. Or you need to spend 14 hours passionately absorbed in a work project.

    Or you wake up feeling so aimless that you spend an entire Saturday morning on Facebook instead of going to the gym.

    You slip up. You fall down. You live a little too hard, have a little too much fun, get a little too intense sometimes. It’s okay. In fact, the unbalanced life is sometimes just what you need
    .


    I don't know about you, but I LOVE this and need to read it every day.  Let's face it....striving for balance in life sounds nauseatingly boring to me!  Striving for perfection?  Puh-lease!  Strive for creativity, passion, FUN....strive for authenticity in your life!  Be you because the people in your life that love you, love you for all your non-perfections, non-moderation quirks!

    Since this is a post all about celebrating one another, I figured what better food to celebrate over than pot roast!  (OK, that was a very weak segue, but I really wanted to share this recipe!)

    • 1 whole (4 To 5 Pounds) Chuck Roast
    • 2 Tablespoons Olive Oil
    • 2 whole Onions
    • 6 whole Carrots (Up To 8 Carrots)
    • Salt To Taste
    • Pepper To Taste
    • 1 cup Red Wine (optional, You Can Use Beef Broth Instead)
    • 2 cups To 3 Cups Beef Stock
    • 3 sprigs Fresh Thyme, or more to taste
    • 3 sprigs Fresh Rosemary, or more to taste
    1.  First and foremost, choose a nicely marbled piece of meat. This will enhance the flavor of your pot roast like nothing else. Generously salt and pepper your chuck roast.
    2.  Heat a large pot or Dutch oven over medium-high heat. Then add 2 to 3 tablespoons of olive oil (or you can do a butter/olive oil split).
    3.  Cut two onions in half and cut 6 to 8 carrots into 2-inch slices (you can peel them, but you don’t have to). When the oil in the pot is very hot (but not smoking), add in the halved onions, browning them on one side and then the other. Remove the onions to a plate.
    4.  Throw the carrots into the same very hot pan and toss them around a bit until slightly browned, about a minute or so.
    5.  If needed, add a bit more olive oil to the very hot pan. Place the meat in the pan and sear it for about a minute on all sides until it is nice and brown all over. Remove the roast to a plate.
    6.  With the burner still on high, use either red wine or beef broth (about 1 cup) to deglaze the pan, scraping the bottom with a whisk to get all of that wonderful flavor up.
    7.  When the bottom of the pan is sufficiently deglazed, place the roast back into the pan and add enough beef stock to cover the meat halfway (about 2 to 3 cups). Add in the onion and the carrots, as well as 3 or 4 sprigs of fresh rosemary and about 3 sprigs of fresh thyme.
    8.  Put the lid on, then roast in a 275F oven for 3 hours (for a 3-pound roast). For a 4 to 5-pound roast, plan on 4 hours.
    I peeled my carrots with a little help from Lola....


    ....and my tiny mini.


    Brown your onions, enjoy the amazing aroma.


    Brown your carrots.


    Set aside your onions and carrots.


    Sear your roast.  Searing helps to lock the juices into the roast.


     Deglaze your pan.  The recipe says you can use wine or broth.  I always opt for wine when given an option in a recipe.  It's a great excuse to open a bottle that, of course, will need to be finished.


    Scrape as much as you can when deglazing.


    Put your roast back into the pan.  Add beef broth, onions, carrots, rosemary, and thyme.  Bake at 275 for several hours.


    The aroma of this roast is so incredible, you may be tempted to lounge and wait by the oven until it is done.